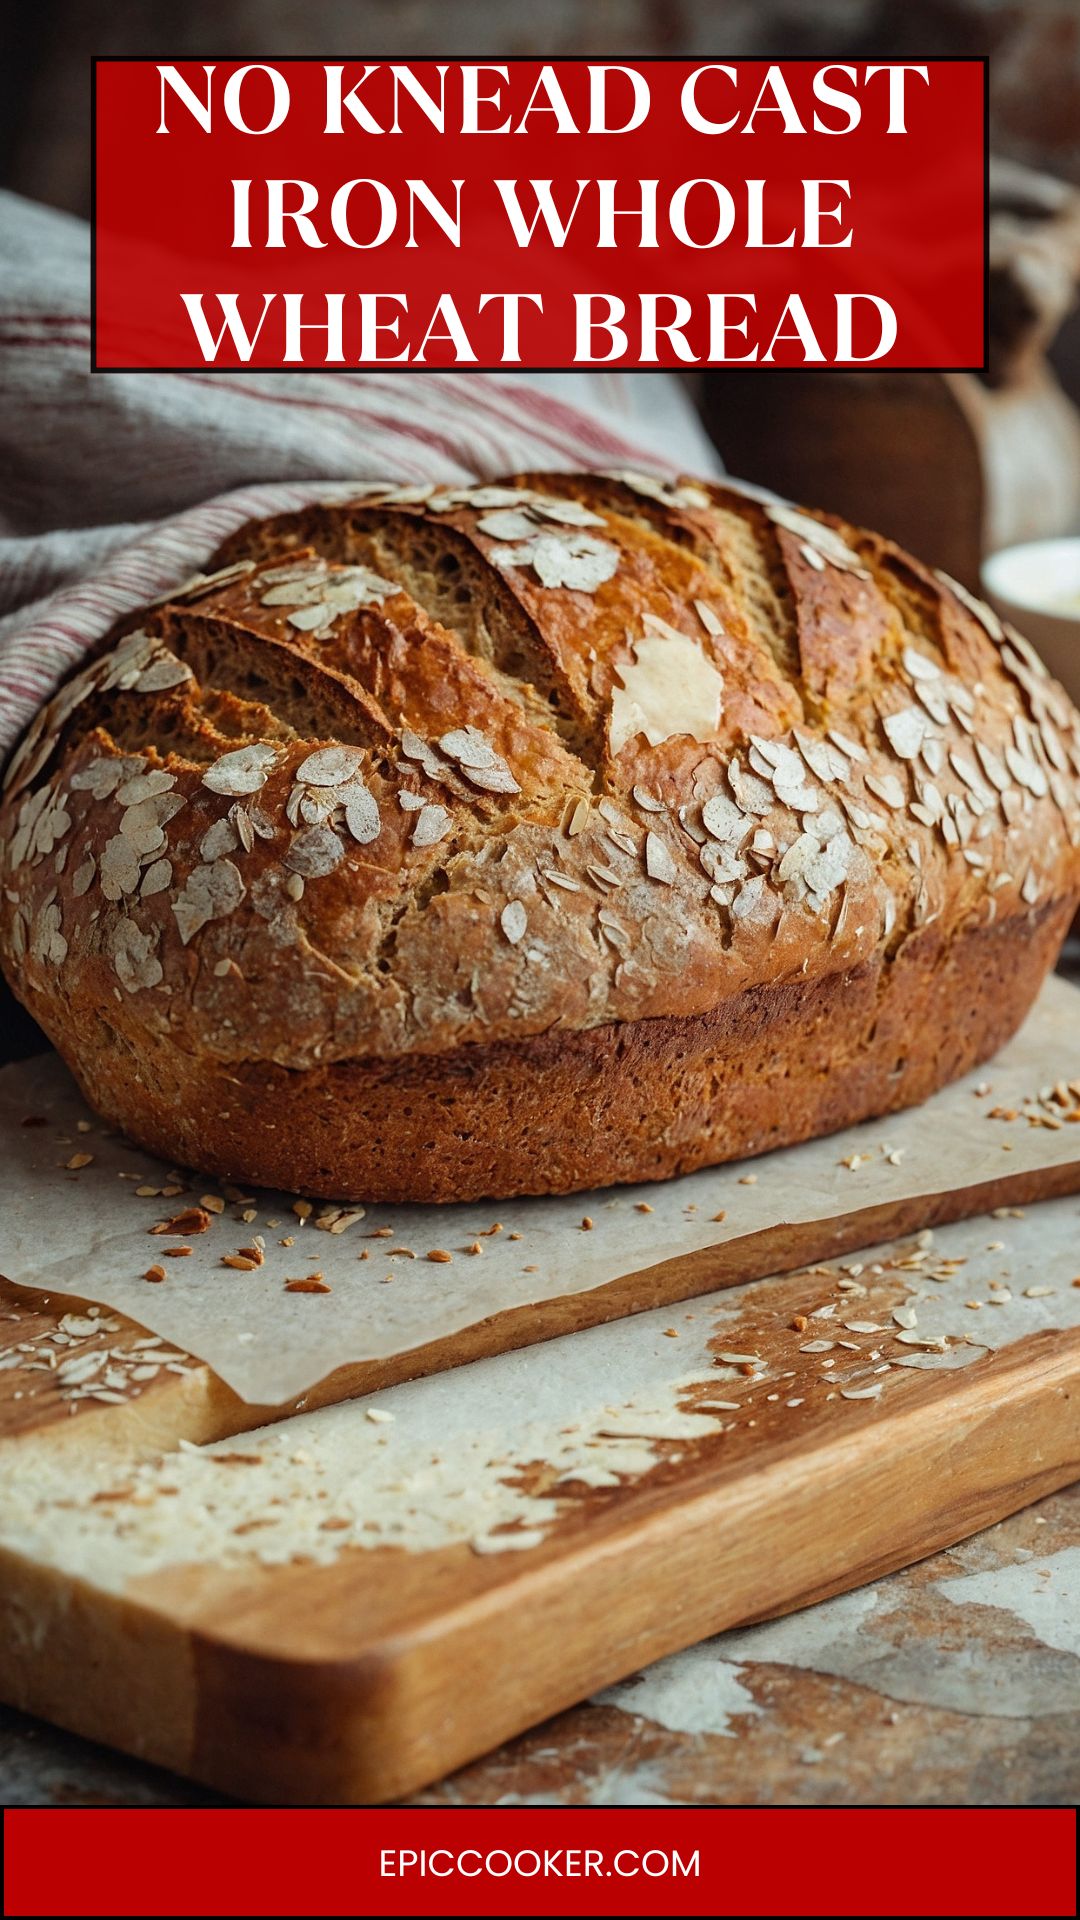
No kneaded cast iron whole wheat bread is not just a loaf; it’s an invitation. Picture this: the aroma of freshly baked bread wafts through your kitchen as a perfect prelude to a cozy meal. While the bread is delightful on its own, it pairs wonderfully with several accompaniments that enhance its rustic charm.
Spread a generous layer of creamy butter or olive oil and sprinkle a dash of sea salt on top. This simple combination brings out the earthiness of the whole wheat. If you’re feeling adventurous, a smear of homemade garlic herb cheese can elevate your experience.
For those fancying something sweet, a homemade strawberry jam brings a delightful contrast. This bread also serves as an excellent base for bruschetta topped with ripe tomatoes and basil. A hearty bowl of homemade soup, perhaps a rich tomato or classic minestrone, is also an ideal match, offering a comforting blend that feels like a warm embrace.

Have you ever stood in your kitchen, yearning for the comforting smell of fresh bread? Well, let me tell you, I have too. This desire led me on a delightful journey to discover the charm of no kneaded cast iron whole wheat bread. The ease of preparation—no intensive kneading, just a leisurely wait while the yeast works its magic—was the hook. But wait, there’s more! This bread not only satisfies the craving but also embraces healthiness with its whole wheat goodness.
Ignoring the notion that bread is a daunting endeavor reserved for professional bakers, I dove into this recipe with an open heart and an eager stomach. Here’s a sneak peek into the world of no knead cast iron whole wheat bread that not only captures the taste of homemade goodness but also becomes a staple in my kitchen rotation.
What is No Knead Cast Iron Whole Wheat Bread?
At its core, no knead cast iron whole wheat bread is a lifeline for anyone seeking to bake bread without the sweat of traditional methods. The no-knead technique is revolutionary. The idea is simple: let time and a little yeast do the work for you. This method relies on a combination of flour, water, and salt that develops flavor over time rather than elbow grease.
What’s special about using cast iron? Imagine a heavy, well-seasoned skillet that traps steam, creating a crispy crust while keeping the inside soft and chewy. This tool not only maintains an even temperature but also encourages a beautiful rise in the dough. Emphasizing whole wheat flour means you’re infusing your bread with fiber, nutrients, and that hearty flavor we all love.
You will also like the following Side Dishes recipes!
- Hungarian cabbage soup with sauerkraut Recipe
- Copycat Lemon Chicken Orzo Soup With Egg
- Delicious Chicken Noodle Soup
What Makes This Recipe Different from Other No Knead Cast Iron Whole Wheat Bread?
You might wonder, “Is this bread really different from other no-knead recipes?” Absolutely! The uniqueness comes from a few clever adjustments inspired by experimentation.
First, let’s talk about flour. While many recipes suggest all-purpose white flour, I’ve swapped part of the mix for hearty whole wheat flour. This simple change amplifies the nutritional benefits. Whole wheat flour used here leads to a denser yet satisfying loaf that’s bursting with flavor.
Next, the addition of flaxseed is a game-changer. It adds an unexpected nutty flavor and a hint of healthy fats. Plus, it provides a delightful texture when combined with the chewy whole wheat flour.
The use of warm water also plays a crucial role. It activates the yeast right from the start, ensuring a lively fermentation process. This means better rise, texture, and overall flavor. In just 12-18 hours, you’ll have a fragrant loaf ready to pop into the oven and satisfy any bread lover.
How Does It Taste?
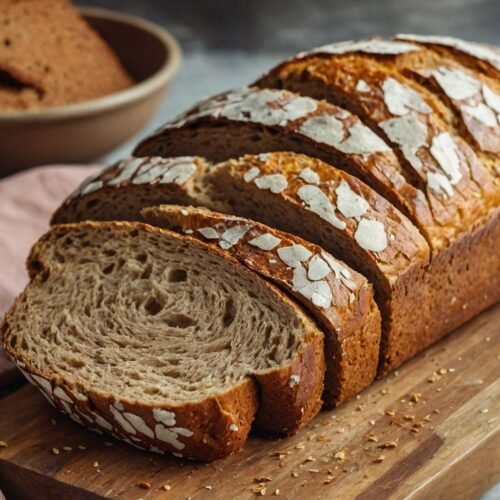
Picture this: you cut into a freshly baked loaf, and the crust shatters under your knife. The first bite is a delightful contrast of textures, with the crust being crunchy and the inside being soft and slightly chewy. The flavor is robust, thanks to the whole grain, with a light nuttiness from the flaxseed.
This bread has a deep, satisfying taste, perfect for dunking in soup or enjoying plain with a drizzle of olive oil. Unlike a white bread loaf, this bread brings character to the table. It’s the type of bread that makes you want to eat slowly, savoring each bite.
Ingredients You’ll Need to Make This Dish
To create this wonderful no knead cast iron whole wheat bread, gather these ingredients:
1 tablespoon olive oil: Adds subtle richness and improves the overall texture.
2 ¼ teaspoons (7g) instant dry yeast: The magic ingredient that helps the bread rise.
1 ½ cups (340g) warm water: Adjusted to be comfortably lukewarm for optimal yeast activation.
1 teaspoon ground flaxseed: Provides a nutty flavor and healthful benefits.
2 cups (270g) high-protein bread flour: Gives structure and support to the dough.
1 ⅓ cups (180g) hearty whole wheat flour: Infuses the bread with fiber and a robust flavor.
1 ½ teaspoons fine sea salt: Enhances flavor and strengthens the dough.

Step-by-Step Instructions
Step 1: Combine the Dry Ingredients
In a large mixing bowl, combine the bread flour, whole wheat flour, salt, and ground flaxseed. Whisk these dry ingredients until they’re well blended. This step is crucial as it helps distribute the salt evenly to ensure that all flavors develop uniformly.
Step 2: Activate the Yeast
In a separate bowl, mix the warm water with the instant dry yeast. Stir gently to dissolve the yeast. Let it sit for about 5-10 minutes until it becomes foamy. This step indicates that the yeast is active and ready to work its magic.
Step 3: Mix the Dough
Pour the yeast mixture into the bowl with the dry ingredients. Add the olive oil. Using a wooden spoon or spatula, stir until everything is combined. The dough should be sticky and shaggy. Don’t worry if it looks a bit messy; that’s expected!
Step 4: Let It Rise
Cover the bowl with plastic wrap or a clean kitchen towel. Leave it at room temperature for 12 to 18 hours. This long fermentation period allows for that wonderful flavor to develop.
Step 5: Preheat Your Cast Iron Skillet
About 30 minutes before you’re ready to bake, place your cast iron skillet in the oven. Preheat it to 450°F (230°C). Preheating the skillet is essential. This method contributes to the crust’s perfect crunch.
Step 6: Shape the Dough
Once the dough has risen and has bubbly, airy structures, turn it out onto a lightly floured surface. With floured hands, gently shape the dough into a round loaf. Don’t worry about making it perfect; rustic is the goal!
Step 7: Final Rise
Cover your shaped loaf with a towel again and let it rise for an additional 30 minutes while the skillet heats. This small rise helps the bread gain a bit more structure.
Step 8: Bake the Bread
Carefully remove the hot skillet from the oven. Place a piece of parchment paper in the skillet for easy transfer. Gently lower your dough onto the parchment. Cover with a lid or another skillet and bake for 30 minutes.
Step 9: Finish Baking
After 30 minutes, remove the lid, and bake for an additional 15 to 20 minutes. You’re looking for a deep golden-brown color.
Step 10: Cool Down
Once baked, carefully transfer the bread to a wire rack. Allow it to cool completely before slicing. This cooling time is crucial for setting the bread’s texture.
Tips & Tricks on Making No Knead Cast Iron Whole Wheat Bread
Patience is key: The longer the dough rests, the better the flavor. Let it ferment as long as you can.
Humidity check: If your dough feels overly dry or too wet, adjust the water slightly. Environmental factors affect how flour absorbs moisture.
Experiment with add-ins: Consider incorporating nuts, seeds, or herbs to infuse your bread with unique flavors.
Keep it simple: Don’t overwork the dough. Just mix until combined, and let the yeast do the hard work.
Test for doneness: Tap the bottom of the loaf; if it sounds hollow, it’s ready!
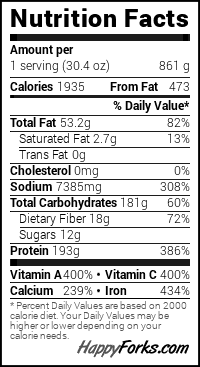
Nutrition Information
Each serving provides valuable nutrients due to the whole wheat flour and flaxseed. Approximately, one slice contains:
How Do I Store This Dish?
Here’s how to keep your no knead cast iron whole wheat bread fresh:
Room Temperature: Store the bread in a breadbox or cut side down on a cutting board under a kitchen towel. This keeps it chewy for several days.
Refrigerator: If the climate is humid, it’s wise to refrigerate to avoid mold. Just wrap the bread in plastic and place it in the fridge.
Freezer: For longer storage, slice and freeze. Wrap each slice in plastic wrap and then place them in a zip-top bag. When ready to enjoy, just toast or warm them in the oven.

What Other Substitutes Can You Use in No Knead Cast Iron Whole Wheat Bread?
All-Purpose Flour: For a lighter texture, swap the whole wheat flour entirely with all-purpose flour.
Spelt Flour: This ancient grain offers a nutty flavor and is packed with protein. Use it in place of whole wheat for a unique taste.
Oat Flour: Ground oats can give a slightly sweet flavor and is a great gluten-free alternative. Mix with a bit of regular flour for a balanced texture.
Honey or Maple Syrup: Instead of olive oil, you can use honey or maple syrup for a touch of natural sweetness.
Chia Seeds: Replace flaxseeds with chia seeds for a similar texture and health benefits. They can do the same job while offering different flavors.
No Knead Cast Iron Whole Wheat Bread Recipe
Equipment
- Dutch oven pan
- Baking sheet
Ingredients
- 1 tablespoon olive oil
- 2 ¼ teaspoons 7g instant dry yeast
- 1 ½ cups 340g warm water
- 1 teaspoon ground flaxseed
- 2 cups 270g high-protein bread flour
- 1 ⅓ cups 180g hearty whole wheat flour
- 1 ½ teaspoons fine sea salt
Instructions
Step 1: Combine the Dry Ingredients
- In a large mixing bowl, combine the bread flour, whole wheat flour, salt, and ground flaxseed. Whisk these dry ingredients until they’re well blended. This step is crucial as it helps distribute the salt evenly to ensure that all flavors develop uniformly.
Step 2: Activate the Yeast
- In a separate bowl, mix the warm water with the instant dry yeast. Stir gently to dissolve the yeast. Let it sit for about 5-10 minutes until it becomes foamy. This step indicates that the yeast is active and ready to work its magic.
Step 3: Mix the Dough
- Pour the yeast mixture into the bowl with the dry ingredients. Add the olive oil. Using a wooden spoon or spatula, stir until everything is combined. The dough should be sticky and shaggy. Don’t worry if it looks a bit messy; that’s expected!
Step 4: Let It Rise
- Cover the bowl with plastic wrap or a clean kitchen towel. Leave it at room temperature for 12 to 18 hours. This long fermentation period allows for that wonderful flavor to develop.
Step 5: Preheat Your Cast Iron Skillet
- About 30 minutes before you’re ready to bake, place your cast iron skillet in the oven. Preheat it to 450°F (230°C). Preheating the skillet is essential. This method contributes to the crust’s perfect crunch.
Step 6: Shape the Dough
- Once the dough has risen and has bubbly, airy structures, turn it out onto a lightly floured surface. With floured hands, gently shape the dough into a round loaf. Don’t worry about making it perfect; rustic is the goal!
Step 7: Final Rise
- Cover your shaped loaf with a towel again and let it rise for an additional 30 minutes while the skillet heats. This small rise helps the bread gain a bit more structure.
Step 8: Bake the Bread
- Carefully remove the hot skillet from the oven. Place a piece of parchment paper in the skillet for easy transfer. Gently lower your dough onto the parchment. Cover with a lid or another skillet and bake for 30 minutes.
Step 9: Finish Baking
- After 30 minutes, remove the lid, and bake for an additional 15 to 20 minutes. You’re looking for a deep golden-brown color.
Step 10: Cool Down
- Once baked, carefully transfer the bread to a wire rack. Allow it to cool completely before slicing. This cooling time is crucial for setting the bread’s texture.
Notes
- Patience is key: The longer the dough rests, the better the flavor. Let it ferment as long as you can.
- Humidity check: If your dough feels overly dry or too wet, adjust the water slightly. Environmental factors affect how flour absorbs moisture.
- Experiment with add-ins: Consider incorporating nuts, seeds, or herbs to infuse your bread with unique flavors.
- Keep it simple: Don’t overwork the dough. Just mix until combined, and let the yeast do the hard work.
- Test for doneness: Tap the bottom of the loaf; if it sounds hollow, it’s ready!
Frequently Asked Questions
Can I use whole wheat pastry flour instead of regular whole wheat flour?
Yes! Whole wheat pastry flour has a finer grind and lower protein content, which will result in a softer loaf. It’s an excellent choice for making a lighter bread.
Can I make this bread without a cast iron skillet?
You can use any oven-safe Dutch oven or a heavy baking dish. However, the cast iron helps to keep the heat steady, so the crust might not develop as nicely with other materials.
What can I do if my dough doesn’t rise?
If your dough doesn’t rise, check the freshness of your yeast. Old yeast might not activate properly. Also, consider the temperature; yeast thrives in warm conditions.
Can I add herbs to the dough?
Absolutely! Fresh or dried herbs such as rosemary or thyme can bring additional depth to your bread. Just mix them into your flour at the beginning.
How can I tell if my bread is baked through?
You want a golden brown crust. Tapping the bottom of the loaf should produce a hollow sound. An internal temperature of around 200°F (93°C) indicates it’s fully baked.
Conclusion
No knead cast iron whole wheat bread has transformed how I view baking. It’s straightforward, rewarding, and oh-so-delicious. The delightful crunch, nutty flavor, and satisfying texture have made it a staple in my kitchen. Plus, knowing it’s made with healthier ingredients gives me peace of mind when serving family and friends.
Whether paired with butter or enjoyed alongside a hearty soup, this bread is versatile and delicious. So, if you’ve felt intimidated by baking bread before, let this recipe empower you to unleash your inner baker. Thank you for joining me on this culinary adventure! Now, let’s get baking!